
You open Canva, ready to create that perfect social media post. An hour later, you’re still nudging a text box by a few pixels, the colors feel ‘off,’ and you’re no closer to a design you feel proud of. Sound familiar? That common frustration isn’t a sign that you lack a “designer’s eye”; it’s the direct result of a missing system. Choose the best Canva course.
In practice, most amateur results stem from the “poke around” method—endlessly tweaking elements without a clear plan. This common approach wastes hours and rarely leads to a professional finish. The gap between your good idea and a good design isn’t about talent, but about having a process. It’s a learnable skill, not an innate gift.
Learning how to improve my design skills with Canva is less about becoming an artist and more about understanding a simple, repeatable workflow. Having a structured path is what allows you to create professional graphics without design experience, turning the tool from a source of confusion into a reliable partner for your projects.
This is where a guided Canva tutorial or course changes everything. Instead of just showing you more buttons to click, it provides the instruction manual you’ve been missing. It hands you the roadmap to move from a blank page to a confident creator, one step at a time.
Beyond Random Tutorials: What Do You Actually Learn in a Structured Canva Course?
You’ve likely spent an afternoon on YouTube, learning a cool Canva trick like how to make text curve. It’s helpful for a moment, but when you need to design a flyer tomorrow, you’re back at square one, staring at a blank screen. This is the frustrating cycle of learning in pieces. A proper Canva course or training session is designed to break that cycle for good by teaching you a workflow, not just a feature.
The difference comes down to learning a single task versus learning a complete process. A good Canva workshop focuses on giving you a repeatable, step-by-step system you can apply to any project, which is the best way to learn Canva fast for the long term.
- Tutorials teach you a single task, like how to add a drop shadow to text.
- Courses teach you a complete system, like how to design a cohesive social media campaign from start to finish.
Ultimately, the goal of Canva training is to give you a design ‘recipe book.’ Instead of just following one recipe (editing a template), you learn the techniques to create your own. You build the confidence to quickly produce professional, consistent graphics every single time, turning frustrating guesswork into a reliable skill. You’ll know exactly what to do when you open the app, which is where the real time-saving begins.
From Blank Page to First Draft in 5 Minutes: A Step-by-Step Canva Tutorial for Beginners
Ditching the blank page is the first hurdle to creating anything. Instead of just typing “flyer” into Canva’s search bar, get specific. Try searching for “minimalist coffee shop grand opening flyer” or “colorful kids bake sale poster.” The more descriptive you are, the closer your starting template will be to your final vision, forming the foundation of this step-by-step Canva tutorial for beginners.
With your template selected, you can start editing instantly using a few keyboard secrets. Forget hunting through menus. Just tap the T key on your keyboard to create a new text box. Need a basic shape? Press R for a rectangle or L for a line. Mastering these three simple shortcuts is a key way people learn Canva fast, turning a clumsy process into a fluid one.
To make that template truly your own, you’ll want to visit the Elements panel on the left. Think of it as a creative treasure chest. This is where you’ll find everything from basic shapes and arrows to millions of stock photos, graphics, and unique icons. Looking for a “hand-drawn arrow” or a “sparkle” effect? The Elements panel is where this simple Canva tutorial unlocks endless personality for your design.
In just a few minutes, you’ve gone from a blank screen to a polished first draft. You used a smart search to find the perfect template, added text and shapes instantly with shortcuts, and customized it with unique graphics. But once your design is complete, how do you share it without it looking blurry or broken? That all comes down to the final, crucial step: choosing the right file type.
PNG, JPG, PDF, Oh My! Choosing the Right File Type to Avoid Blurry or Broken Designs
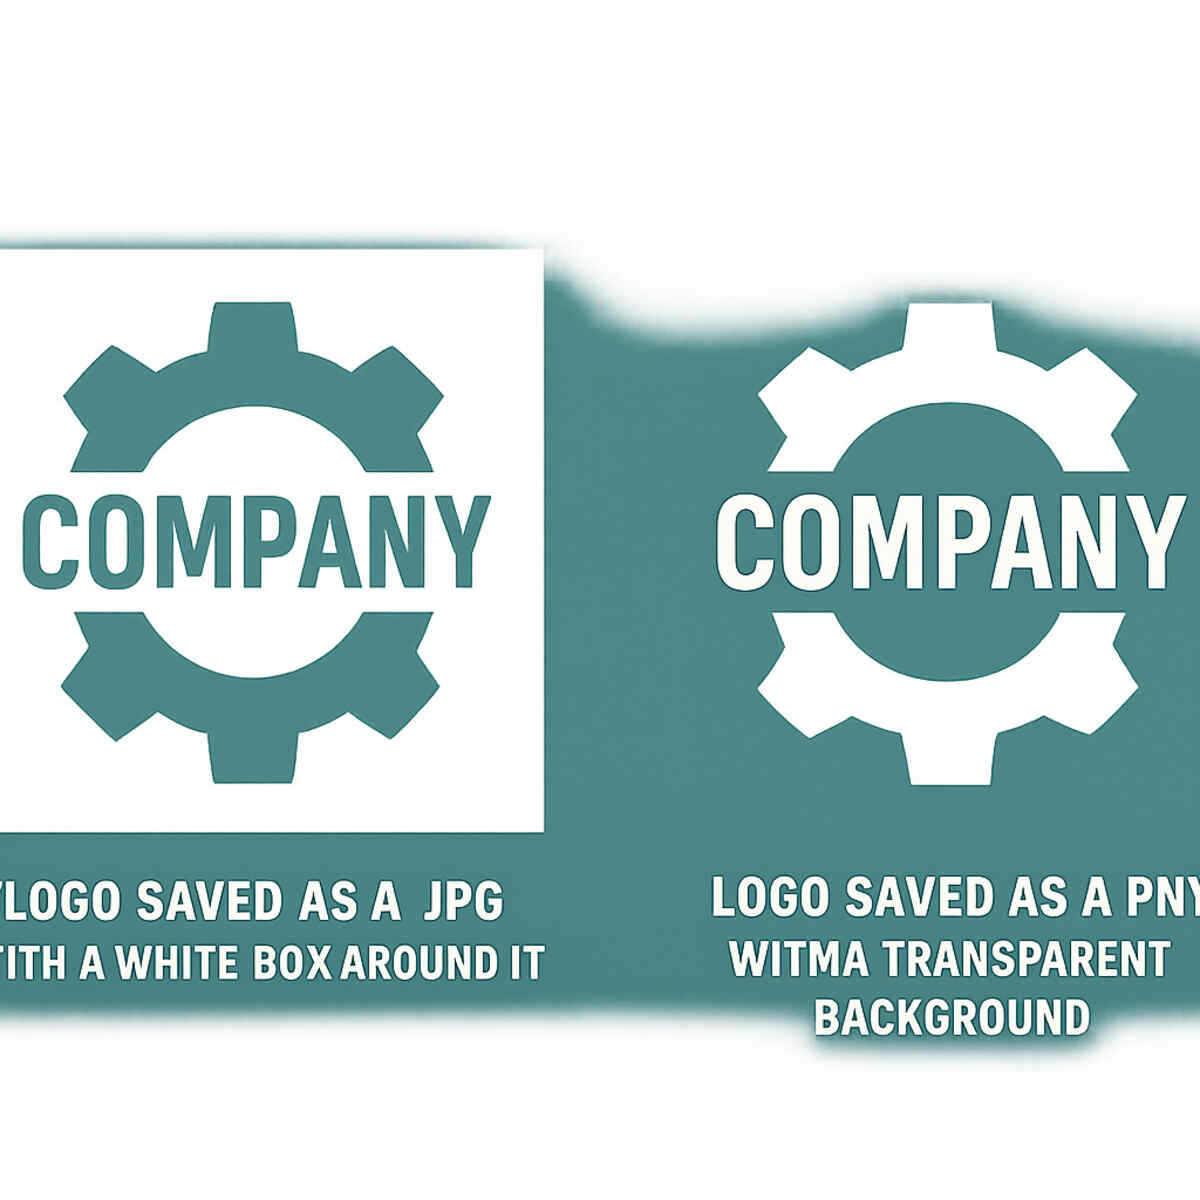
You’ve finished your design, but hitting “Download” can feel like a guessing game. The last thing you want is for your beautiful logo to show up with an ugly white box around it on your website. To create professional graphics that blend seamlessly onto any background, you need a PNG. Think of it as a file type with a superpower: the ability to have a transparent background. As you can see in the example, the PNG logo looks clean and professional, while the JPG version is stuck in a clunky white square.
So, when should you use a JPG? That file type is perfect for photographs. JPGs are masters of compressing photos into smaller file sizes, which is crucial for keeping your website or blog from loading at a snail’s pace. If your design is a photo-heavy social media post or a website banner, choosing JPG will give you a great-looking image that won’t slow things down for your visitors. It’s a simple choice that makes a big difference in user experience.
Finally, there’s the PDF, the most reliable format for documents. If you’ve designed a resume, a flyer to be printed, or a multi-page guide, PDF is your best friend. It essentially freezes your design, ensuring that all your fonts, images, and layouts look exactly as you intended on any device or printer. Proper Canva graphic design means choosing “PDF Print” for professional printing and “PDF Standard” for web use. This knowledge is a fundamental part of any good Canva training.
Knowing which file to use is one thing, but what about the design itself? Now that you can save your work properly, let’s explore a few secrets that make any design look more polished and intentional.
The ‘Pro Look’ Secret: Three Simple Rules to Make Any Design Look Better
Ever create a design where everything feels a little chaotic, like a messy room? You have all the right information, but it just doesn’t look professional. The secret to fixing this isn’t about being a born artist; it’s about learning a few simple rules of organization. Understanding these graphic design fundamentals using Canva is the fastest way to transform your work from amateur to polished.
Take a look at the flyer design here. In the “Before” version, your eye doesn’t know where to land first. The “After” version fixes this with two simple tricks. First, it creates a Clear Focus by making the headline (“Annual Bake Sale”) the biggest and boldest element. Second, it gives the details Breathing Room. Notice how the date, time, and address are grouped, separate from the other text? This is like putting all your socks in one drawer—it instantly makes things tidy and easy to find.
Another powerful change is Consistency. The “Before” design uses several different fonts and colors, which looks cluttered and unintentional. The “After” version achieves a clean, cohesive look by using only two fonts and three related colors throughout the entire design. Limiting your choices like this is one of the easiest ways to create professional graphics without design experience, as it automatically makes everything feel like it belongs together.
Following these rules is a game-changer, but having to remember your specific fonts and brand colors for every single project can be a chore. What if you had a ‘digital spice rack’ where all your brand’s essential ingredients were stored, ready to use with a single click?
Your ‘Digital Spice Rack’: How the Brand Kit Creates Effortless Consistency
That digital spice rack we mentioned? It’s a real feature in Canva called the Brand Kit. This is one of the most powerful tools included in Canva Pro features training, as it lets you store all your brand’s essential elements—your logos, your specific fonts, and your exact brand colors—in one central place. Instead of hunting for them every time, you can apply your entire brand look to any new design with just a single click. This guarantees every graphic you create feels instantly familiar and professional, saving you a huge amount of time.
But what if you’re using the free version of Canva? A great course will teach you a clever workaround: creating your own one-page Style Guide. Think of it as a simple document where you place your logo, type out your font names, and add colored squares for your brand palette. You can even paste in the special six-digit Hex Code for each color, which is like the unique recipe number for your exact shade of blue or green. You just keep this page open in another tab and copy from it.
Whether you use the automatic Brand Kit or a manual Style Guide, the result is the same. Consistently applying your chosen elements is the secret sauce for effective Canva for small business owners and anyone wanting to learn Canva for social media marketing. It builds recognition and trust with your audience. Once you’ve mastered this consistency, you can start exploring how to make your static designs more dynamic. For instance, what if you could make that “SALE” text gently pulse to grab a viewer’s attention?
From Drab to Dynamic: Creating Simple, Eye-Catching Animations in Under 60 Seconds
That idea of making text pulse is one of the most accessible advanced Canva tricks and tips, and you don’t need to be a video editor to do it. Canva has a simple feature called “Page Animations.” With a single click, you can make every element on your page—the text, the photos, the background—swoop in, fade, or pop. It’s the fastest way to turn a static graphic into an eye-catching video, instantly making your Canva graphic design work feel more professional and dynamic on a busy social media feed.
For more control, you can also animate individual pieces of your design. Instead of making the whole page move, maybe you just want your logo to gently pulse or a line of text to slide into place. By clicking on a single element (like a text box or a photo), you can apply a specific animation just to that item. This is perfect when you want to draw attention to the most important part of your message without overwhelming the viewer. This is a key skill when you learn Canva for social media marketing, as it helps guide the viewer’s eye exactly where you want it to go.
Once your design has motion, Canva lets you download it as either an MP4 file (a standard video) or a GIF (a short, looping animation). This is the final, crucial step that transforms your work from a project inside Canva into a piece of content ready for Instagram Stories, Facebook feeds, or email newsletters. Being able to quickly create and export these small videos is a game-changer. Imagine applying these skills to a planned-out process, where you could design an entire week of dynamic social media content in less than an hour.
Create a Week of Social Media Content in Under an Hour: A Pro Workflow
That idea of creating a week’s worth of dynamic content in under an hour isn’t a fantasy; it’s a strategy. Professionals don’t wake up every day and frantically design a post from scratch. Instead, they use a method called “batch creation,” where they dedicate one block of time to create all their content for the upcoming week. This simple shift in approach is the first step to turning Canva from a daily chore into a powerful efficiency tool.
The key to making this work is to build your own reusable templates. A good course teaches you to move beyond searching for a new design every time and instead create a small set of custom, on-brand templates for your most common needs. This is a game-changer for anyone wanting to learn Canva for social media marketing. A typical starter set includes:
- A Tip or How-To Graphic
- A Quote or Testimonial Graphic
- An Announcement or Sale Graphic
- A Behind-the-Scenes Photo Graphic
Once your branded templates are saved, the workflow is astonishingly simple using Canva’s “Duplicate Page” feature. You just open your “Quote” template, click “Duplicate Page” four times, and then swap in the new text for each day. In a matter of minutes, you have five consistent, professional graphics ready to go. This is truly the best way to learn Canva fast for real-world content production.
This repeatable process is transformative for Canva for small business owners, creators, and marketers. You regain hours of your week and ensure every single post looks polished and consistent. While this workflow is effective in any version of Canva, some of the most powerful time-saving tools, like instantly resizing your entire week’s content for different platforms, are found in the paid version. This often brings up an important question.
Is Canva Pro Worth It? A Feature-by-Feature Value Breakdown
The moment you start working efficiently, one question always comes up: is it time to upgrade to Canva Pro? For many Canva for small business owners, the answer isn’t about the monthly fee, but about the return on that investment—specifically, the return of your time. While the free version is great, a good Canva Pro features training focuses on three game-changing tools that professionalize your work and slash your design time. As shown below, these are the one-click Background Remover that instantly isolates your products, the Brand Kit that keeps every design consistent, and Magic Switch, which can turn a single graphic into a complete social media campaign for different platforms in seconds.

To put the price in perspective, consider this: the monthly cost for Canva Pro is often less than what you’d pay for a single premium stock photo from another website. With a Pro account, however, you gain access to an enormous library of millions of premium photos, videos, and graphics. This alone can justify the subscription, as you’ll no longer need to budget for stock assets or spend time searching for high-quality freebies that haven’t been overused. It shifts your mindset from scarcity to creative abundance.
So, how do you make the final call? Calculate the value of the hours Pro will save you. If the platform saves you just three or four hours a month—a very conservative estimate once you master the pro workflow—what is that time worth to you in dollars? When you realize the subscription pays for itself by letting you focus on other parts of your business, the value becomes crystal clear. But before investing in any training, whether free or paid, it’s important to understand the landscape.
Free vs. Paid Courses: What’s the Real Difference in a Canva Training?
A quick search reveals thousands of the best free Canva design tutorials, and many are fantastic for solving one specific problem. Resources like the official Canva Design School are great for learning how to curve text or find a new feature. But this approach is like learning a single guitar chord—it’s useful, but it won’t teach you how to write a song. Free content teaches you a task; a structured course is designed for a total transformation, turning your frustrating process into a confident workflow.
The biggest difference often isn’t the content itself, but the support system. When a free video doesn’t quite match what you’re seeing on your screen, you’re left to figure it out alone. A quality paid online class for Canva beginners, however, usually includes a community of fellow learners and access to the instructor. Getting your specific question answered about your project is what turns a moment of frustration into a learning opportunity, a value you simply can’t get from a pre-recorded tutorial.
Ultimately, paying for a course is an investment in speed and confidence. You are buying a guided path that saves you dozens of hours of trial-and-error, second-guessing, and searching for answers. This structured learning builds the foundation you need to work efficiently and create designs you’re proud of, every single time. For those wanting to prove their new skills, this raises a natural question: should you get a “Canva certification”?
Should You Get a “Canva Certification”? The Honest Answer for Your Career
A common question is whether a Canva certification is worth it. The simple truth is that there is no official, industry-recognized “Canva Certification.” The certificates you receive from most courses are certificates of completion, showing you finished the training. While they represent your commitment, they aren’t the key that unlocks professional doors on their own.
In the world of design, seeing is believing. A portfolio—a collection of your best work—is infinitely more valuable than any certificate. Imagine you’re hiring someone to create social media posts. Would you rather see a PDF that says they took a class, or a stunning collection of 10 graphics they actually designed? A strong portfolio proves your skill and is the ultimate testament to your ability to create professional graphics.
This is where a high-quality course truly shines. Its primary goal shouldn’t be to hand you a certificate, but to guide you through creating portfolio-worthy projects. As you learn graphic design fundamentals using Canva, you’ll be building the tangible evidence of your talent. The course projects become your proof, transforming you from someone who just uses Canva into someone who can confidently showcase their design skills for a new job or client.
Your Next Step: From Canva User to Confident Canva Creator
Remember the frustration of nudging a text box for an hour, only to end up with a design that still felt “off”? That feeling comes from working without a map. You now understand the difference between randomly clicking and following a structured process. The best way to learn Canva fast isn’t about memorizing buttons, but about building a reliable workflow that gives you back your time.
So, how do you improve your design skills with Canva starting today? It’s not about tackling everything at once. It’s about taking one focused step forward. Here is a simple, three-step plan to turn that knowledge into real confidence:
- Identify Your Biggest Struggle: Is it speed, the quality of your designs, or making everything look consistent? Pinpointing the pain is the first step.
- Find a Targeted Solution: Search for a specific tutorial for small issues. If the problem is bigger, a structured Canva course provides the complete path you need.
- Practice with One Project: Don’t just play around. Apply what you’ve learned by redesigning your resume or creating one social media template.
You’re no longer just trying to use a tool; you’re on the path to becoming a confident creator. Every professional-looking graphic you produce isn’t just a win for your project or business—it’s proof that you can turn creative ideas into reality, quickly and skillfully.